
This is a Guest Blog post by Jim Ausfahl .
Disclaimer: This material has been modified from the public domain US Military field manual, FM 5-80.
What is a Cravat Bandage?
Also known as the cravat bandage, triangular bandaging has been used by the military since before the American Civil War. Although it is not the ideal bandage for any situation, it is a bandaging tool that, with a little training, can bandage almost any area of the body.
The standard triangle bandage is a right triangle, with two sides 40″ (about 102 cm) on each side, with the long side being about 56.6″ (about 144 cm) long. On the internet, such bandages can be bought cheaply, generally with a couple of safety pins, which are a necessary adjunct for some dressings. The exact dimensions are, however, not important, nor is the material of which the bandage is made; traditionally, unbleached muslin is used, but almost any other material will do; even a shirt can be repurposed for a triangle bandage.
Folding the Cravat Bandage
To convert a triangle bandage into a cravat, take the right-angle point of the bandage and put it to the middle of the long edge; the two flat sides will be parallel. Take the shorter of the two parallel sides and fold it over to the long side. Do that a second time, then a third time. This will generate a band of cloth, with as many as eight layers, about 3 ½” wide and a bit over 56″ across.

Two such cravats can be used to make a tourniquet; four will do nicely to lock a splint in place, tying two above the fracture and two below it to anchor the splinting material to the extremity. The cravat can also be used in several other ways.
In this, the first of several blogs on bandaging, let’s look at using a triangle bandage for a sling.
Using a Cravat as a Sling
One of the easiest things to do out in the wild is to fall, and the landing will often injure the arm or the shoulder—hopefully just a sprain, possibly a fracture. Either way, there will be need for a sling to support the wounded extremity. To make a triangle bandage into a sling, start by putting the bandage with the right angle off to the side and just above the elbow on the injured side with the long side going roughly up and down, over the middle of the chest. Have the victim hold the arm against the bandage to lock it in place. Move the victim’s hand up, so that the knuckle of the fifth digit—the pinky finger—is about a hand’s breadth above the crook of the injured elbow. That done, take the lower end of the bandage upward and around the victim’s neck, on the side away from the injured limb, bringing it behind the neck and tying it to the other end of the bandage. To create a pouch to support the elbow, bring the right angle of the bandage forward and pin it to the front of the sling. The whole should be just tight enough to lift the load of the arm off the shoulder. The diagram below gives a clearer picture of how this works than my description does.

There’s one problem with this sling: it puts pressure on the collar bone on the injured side. If the collar bone is broken, this just won’t do: the sling will be too painful to be endured. Fortunately, there is a second method of creating a sling that will get around the problem.
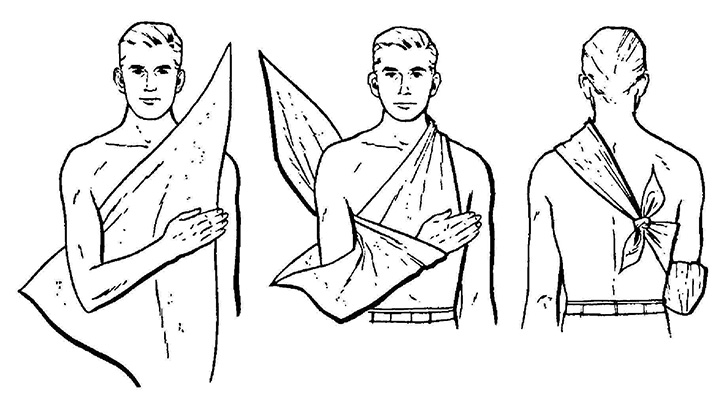
The starting point is the same: the triangle bandage is placed on the front of the victim’s body, with the right angle of the bandage outside the elbow on the injured side, and the long edge roughly up and down on the chest, with the victim’s hand positioned so that the knuckle of the least, or pinky, finger is about their hand width above the bend of the elbow. For this sling, the lower corner of the bandage is brought up and threaded under the armpit on the injured side, to meet the other corner across the uninjured shoulder, and tied. As with the first sling, the right angle is then brought forward and pinned to the front layer of cloth to produce a pouch. Again, the sling’s pouch should be created so that the weight of the injured arm is supported by the sling, not the shoulder. The diagram below should clarify things considerably.

That’s enough for this blog. Practice the slings on friends and fellow survivalists. Please do NOT practice tourniquets on other people: use a phone pole or a 4″ PVC pipe or something.
The next blog in this series will be other bandaging techniques for the shoulder, arm and hand.
Jim Ausfahl is a physician in active medical practice, in Peoria Heights, Illinois, studying the art of surviving in a challenging environment and sharing the little he knows.


No Comments