
This is a Guest Blog post by Jim Ausfahl .
Disclaimer: This material has been modified from the public domain US Military field manual, FM 5-80.
Last week, we looked at using a triangle, or cravat, bandage for a tourniquet, splints and slings. As a reminder, the triangle bandage is a piece of cloth, often unbleached muslin, that is a right triangle with legs about 40″ (102 cm) long, and a hypotenuse, or long side, around 56.6″ (144 cm). It is folded on itself three times to make a cravat bandage. Remember: for all wounds, the first thing to do is to control the bleeding, clean and cover the wound with gauze padding, and if it is available, some antibiotic ointment. The bandage is used to lock the gauze in place. In looking at the bandaging below, it will be assumed that has already been done. This week, let’s look at bandaging parts of the arm, starting with the hand.
THE HAND
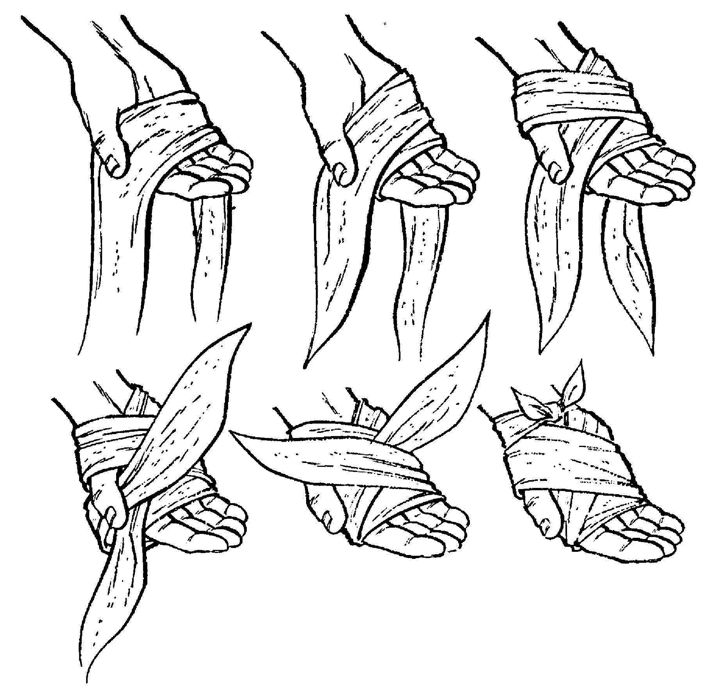
Start by laying out the triangle bandage with the long side toward the person to be bandaged. Place the wounded hand, usually with the hand on top of the gauze, so that the edge of the triangle bandage is a about one to two inches past the wrist toward the elbow. The long finger of the hand should point to the right angle of the bandage. The diagram below will make this clearer.

Bring the point of the right triangle back over the hand, then tuck the sides, clear to the points of the triangle, which will narrow the two bits of cloth going to the sides; again, the diagram should clarify this. With that done, wrap one side over the hand and under the wrist, being careful to keep a bit of pressure on the gauze without disturbing it. Do the same thing with the other one, gently tighten things up and then tie the two loose ends over the wrist with a square knot. If there is a bit of the bandage sticking out from under the knot, it can be wrapped over the knot and tucked under it.
Sometimes, however, it is not necessary to bandage the fingers and desirable to keep them free. There is an alternative bandaging to permit that. Fold the triangle bandage into a cravat, then lay the middle portion of the cravat on the gauze padding. Bring the free ends under and over the hand then back under the wrist and over the hand. Finally, loop the free ends under the wrist again, bring them back over and fix in place with a simple square knot. The diagram below makes this much clearer.

THE ELBOW and ARM
Bandaging the elbow also starts with folding the triangle bandage into a cravat. The injured elbow needs to be positioned to about 90 degrees, and the middle of the cravat placed at the point of the elbow. One side of the cravat is wound once or twice, overlapping about an inch, over the upper arm; the other one, over the part of the arm below the elbow. The free ends of the bandage are tied in a square knot on the inside of the bend of the elbow. The diagram of this procedure is below.

A nearly identical procedure will work to bandage the forearm or upper arm. The middle of the cravat goes over the gauze, then one end is wound around the arm going upward, overlapping an inch or more, with the other going around and down. The free ends are tied, diagonally across the bandage, in a square knot.
Next time, the topic will be bandaging parts of the leg.
Jim Ausfahl is a physician in active medical practice, in Peoria Heights, Illinois, studying the art of surviving in a challenging environment and sharing what he knows.


No Comments