
A GUEST POST BY FRANK GRINDROD
In this post, I’ll teach you how to build a wilderness survival shelter (and gain 20 years of bushcraft skill knowledge) in 5 easy steps. I’m also including my downloadable checklist that you can print off and use at home when you take your skills into woods (or backyard) and build your own wilderness survival shelter.

Did you know that an average of 4,660 hikers per year need search & rescue across U.S. National Parks? If you like to visit state or national parks, hike, or are just a fan of the great outdoors, getting lost in the wilderness can easily happen to you. Everyone needs to know how to build a wilderness survival shelter. It is a critical bushcraft skill that can make the difference between life and death when lost or disoriented. Read on for essential know-how and steps to take to build a wilderness survival shelter, and don’t forget to get your copy of our Free Bushcraft Skills: Wilderness Survival Shelter Checklist!
How to build a Bushcraft Wilderness Survival Shelter if You’re Lost in the Woods. Could You Survive?

FREE WILDERNESS SHELTER TRAINING CHECKLIST!
Download & Print for your at-home Survival Library.
Did you know lost day hikers compromise 42% of US National Parks search and rescue cases, with the next closest group being overnight backpackers? Shelter is one of the keys to surviving an overnight in the woods. All outdoor adventurers need to have the bushcraft skills to know how to build a wilderness survival shelter since losing your way on a trail can happen to anyone.
Are You Prepared for ANY Emergency?
Shelter is one of the key elements of your ability to survive an emergency, yet is often overlooked. The rule of threes states you can survive 3 minutes without air, 3 hours without shelter, 3 days without water and 3 weeks without food. Getting lost on a day hike can easily cost you a few hours — are you prepared to spend the night in the wilderness? Having a bushcraft skill like shelter building can make all the difference. Learn to build a shelter to make sure you and your family are safe.
Before you Begin Start with a Survival Mindset
No matter what the emergency, maintaining control is paramount. You have to develop your survival mindset. With a few basic materials you can build a shelter to protect you and your family until help can arrive. Below are a few initial thoughts to consider:
- Stay calm.
- Assess your location and take an inventory of the resources you have to work with.
- Is there high ground?
- Running Water?
- Start with a clear visual plan of how you will build your shelter.
Your positive mindset and ability to lead those around you will impact the outcome of your situation. Remember to S.T.O.P.
Stop – This means to just STOP! Don’t go any further. This is an effective emergency protocol that is used by search and rescue, professional outdoor guides, Scouts and others.
Your primal brain is likely in survival mode, and wants to fight, flight or freeze.You can reset that by taking a few calming breaths and centering yourself. This is important, because you’ll have access to more resources when your mind is free of the survival stress.
When you stop, you also create a ‘scent pool,’ where your scent flakes are falling from your body to the area around you. This creates a scent concentration, and is helpful for dogs to locate you if search and rescue teams use them. Trainings for youth suggest that they hug a tree. If children are with you, have them do this.
Think – Now that you have a calm mind and have accepted that you are lost, you can prioritize your thoughts.
Psychology is 80% of your success. 20% is mechanics. Some people, with the right mindset, have been able to survive unbeatable odds.
Now it is your turn – you need to start telling yourself that you will make through this and thrive. Proactively think of your basic needs – shelter, water, fire for warmth and signaling, food, and first aid if necessary.
Observe – Be still for a moment and use your senses to observe the area. Look for the direction of the sun or moon, listen for water and wildlife sounds, sniff for smoke or swampy water. Check the topography of the land and see if there is a commanding viewpoint. Notice where you are and determine if this is a good location to build a wilderness survival shelter if needed.
Plan – It is important to create a plan for your situation and know how to implement and take ACTION.
The universal sign for emergency is three – you can make noise with three shouts, three gunshots, three whistles.
You can create a smoky signal fire to attract attention or mark your area with a visual signal – bright clothing like a red coat or yellow rain poncho if you have it. In case you are not found quickly, start your plan for an overnight stay in the wilderness with the steps below.
How To Build a Wilderness Survival Shelter Step #1
Location First

When considering how to build a shelter for survival, one of the first things you will need to think about is location. You don’t want any rotting trees toppling over on your survival shelter, nor do you want to be too close to water for mosquito, dampness and cross-contamination reasons – so be aware of the landscape when choosing a survival shelter location.
You want to find a high and dry flat area to build your wilderness survival shelter. Even though you are creating a microclimate within your wilderness survival shelter, it is a good idea to have a location with southeast or southern exposure to get the benefit of the sun during the day. Having the back of your shelter facing west will help protect you from winds and storms.
Choosing an area with a lot of easily collectible leaves and leaf debris on the ground is ideal for building a survival shelter quickly and efficiently.
Here are some great tips about location:
- Take your time to choose a good location
- Be aware of weather patterns and any recent storm damage in the area
- Identify the type of forest and look at the topography
- Don’t want to build in an area where there could be drainage
- An area may look dry but plants will tell you if its a wetland area
- Create a microclimate with your wilderness shelter
- Insects to watch out for- mosquitoes, biting flies, stinging insects or ants.
- Transition zones are the best for building your shelter and having everything you need
- Make sure your shelter faces the direction of the morning sun to dry out and warm up your shelter. In the US, that is east/southeast.
- Back of the shelter should face the direction storms and winds come from, so they can come up and over the shelter. In the US, that is generally west.
Watch this video with TIPS about choosing a good shelter location!
How to Build a Wilderness Survival Shelter Step #2
Framing for Support

After you have decided on the general location for your bushcraft survival shelter, the next step is to find a sturdy, straight ridgepole. It should be at least the thickness of your forearm and a few feet longer than you are. Ideally, the ridge beam will be solid and capable of holding a couple hundred pounds. This will be the main beam for your survival shelter.
Next, support the ridgepole using a fork in a tree, Y-sticks, or an elevated fallen log. The lower to the ground your ridge pole is, the less space you must heat up. Make sure to leave room for bedding!
6 TREES Every Survivalist Should Know: https://willowhavenoutdoor.com/featured-wilderness-survival-blog-entries/5-trees-every-survivalist-should-know-why/
Do a push test to make sure the beam does not slide forward, back, or from side-to-side easily. The ridge pole and its supports should be stable. The base of the beam can be lodged against a tree to prevent slippage. If you have the means, lash your pole with rope, a shoelace, or a tree root.
For the sides of your wilderness survival shelter, find sticks to make ribs. Line them along the ridgepole at about a 45-degree angle, as close together as possible, extending just an inch or two above the top (but no longer). Adding a thin layer of wide branches to the ribs can act as lattice, helping to keep the debris layer that you will add on the outside of your wilderness survival shelter.
Here are some tips about framing for your wilderness shelter:
- Take the time to find a good ridgepole
- You need a ridgepole as long as you are tall (with your arm reaching up), as it is the backbone of the shelter
- Make your ridgepole and shelter hip height so you have less space to heat up
- Use cordage to lash on your ridgepole
- Best natural materials for cordage: Vines, the inner bark of trees or roots from the pine family are great for this
- Gather your ribs and size them
- Put a lattice over your ribs/frame to keep your debris covering out of your wilderness shelter

How to Build a Wilderness Survival Shelter Step #3
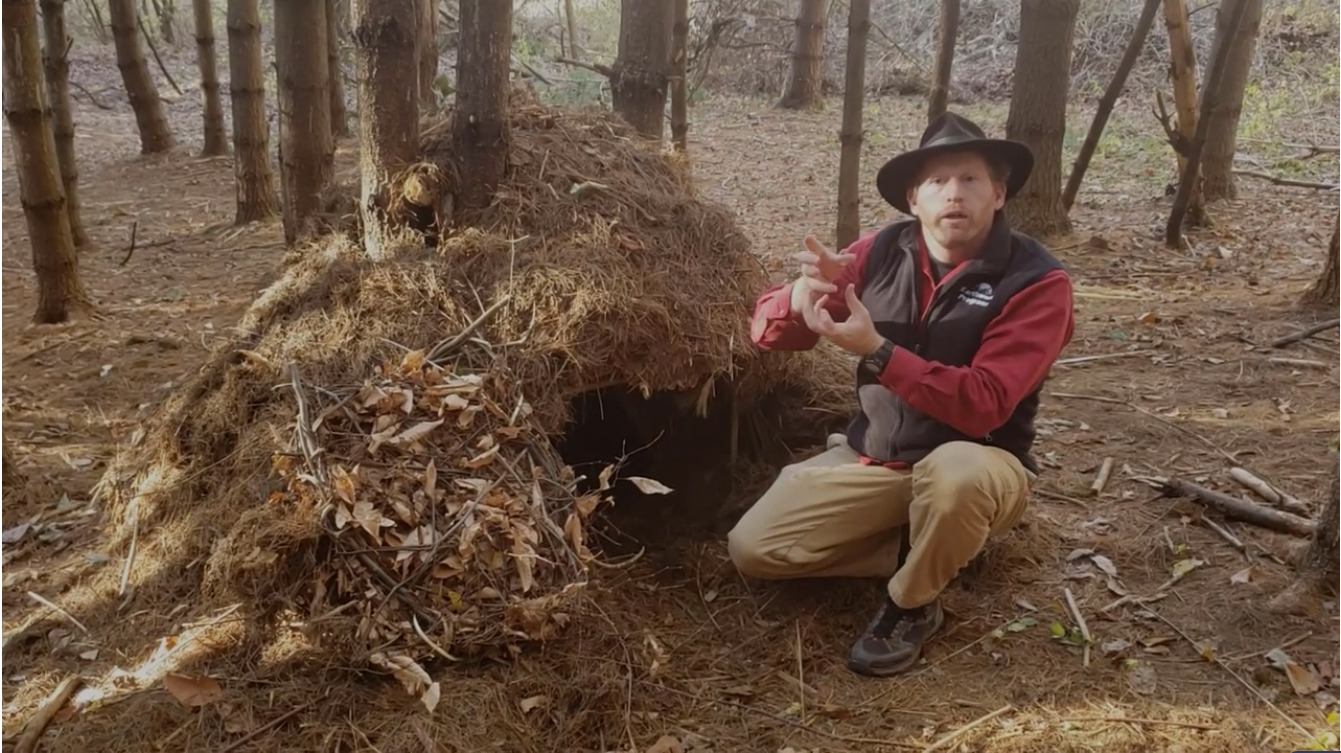
Adding Debris for Insulation

Before you can add layers of insulating debris to your survival shelter, you must first gather it. You will need tons of debris, as you’ll be adding and packing several feet of it to the outside of your shelter framing. Here are some tips about debris:
- Use a stick or branch to scrape debris towards you to protect your hands.
- Keep a very big bundle of debris outside your survival shelter in case you need more during the night.
- DRY leaves and grasses insulate best. Pine needles will work, but are not the best insulating.
- In warm weather, you need at least 2 feet of debris. Colder weather requires at least 3-4 feet of debris.
- If you must use green or wet debris, you need to add at least 1/3 more material.
Cover your framing with large piles of debris, then pack the debris by pushing it down the angle of the ribs toward the ground. This helps with insulation. Add more debris and continue until you have your desired thickness of debris on your wilderness survival shelter. Once done, add some sticks, light branches, or bark to protect your debris insulation from any rain and wind. Your fire should be far enough away so that any stray sparks cannot reach your wilderness survival shelter and ignite it!
Click here to read our article about other ways to use leaves for survival: https://willowhavenoutdoor.com/featured-wilderness-survival-blog-entries/12-survival-hacks-using-just-leaves/
Add insulation to the inside for bedding and to insulate your body from the ground. Stuff the inside. You want 6-8 inches of debris for an insulating layer to sleep on.
Here are some extra tips for adding your debris:
- Gather debris efficiently in big armloads to bring it back to your shelter
- Pile your debris over your frame in a dome shape to help water cascade down away from the inside of your shelter
- Pack your debris down and then pile on more
- Pile debris inside the hut for insulation between your body and the ground
- Body heat will help dry leaves and will hold more air space between the leaves
- A wilderness shelter debris hut is a giant tinder bundle so be careful of where you put your fire!
How to Build a Wilderness Survival Shelter Step #4
Door Building for Protection
PHOTO: ENGAGING PHOTO (How_To_Build_A_Wilderness_Survival_Shelter_4)
Lastly, you will want a door for your wilderness survival shelter. Just sealing your shelter with a large piece of bark is not enough, as you need more to keep the heat inside your shelter. If you have it, you can use a blanket, a backpack or an extra coat to help insulate your survival shelter entryway.
If you want to take the simplest approach, you can pull in a large pile of debris into the door space after you crawl in.
You can also weave two mats from saplings or vines, stuff them with debris, and lash them together for a door. 72 hours is the standard time to be prepared for with an emergency, so you will want a well-constructed door like this.
Here are some great tips for your shelter door:
- Make a door plug that’s insulating, like making two discs of saplings like a cookie
- Find an area with young saplings that are choking out the rest of the forest
- Harvest branches at the weakest point and bend and slice them
- If it’s hurting your hands pulling the branches, make a little glove with other branches to protect your hand
- Weaving is an important skill for a good shelter door, but a random weave will work.
- Under over, under over, using spaces to your advantage. Friction will help hold things together. The more weavers you have, the more tighter and stronger your door gets.
- Gather debris, place one mat down, debris on the mat, then the other mat on top. Lash these together to create your wilderness survival shelter door.
- Take down vines that are going to kill the tree anyway, then use fingers to guard as you split the vine down the middle
- Split separation will create more lashing material than you started with, and you can use this for lashing a shelter, making a basket, a door plug, and traps!
Next Steps
Mastering Your Bushcraft Skills

Did you know that you can die of hypothermia even when temperatures are in the 50s, and that New Mexico – a warmer state – ranks No. 4 in the country when it comes to people freezing to death? This is why shelter is imperative when it comes to surviving in the wilderness. Putting all of the above steps together to build a wilderness survival shelter can mean the difference between life and death if you need to spend a night or more in the bush.
Here are some pro tips for bushcraft survival:
- When building your wilderness survival shelter, you need lots of wood (trees) and leaf debris. A thicker covering is better than a too-thin one!
- If you’re able to build a fire, you should start and maintain one. Make sure it is not too close to your wilderness survival shelter! Learn how to start a fire using the sun here: https://willowhavenoutdoor.com/general-survival/8-solar-fire-starting-tips-you-must-know-and-a-free-gift-from-creek/
- Using green boughs for fire will create a lot of smoke and act as a signal fire to help you be found.
- You should have or find a water source, but don’t build your wilderness survival shelter too close to water, especially stagnant water like a bog or swamp.
- For safety, be aware of any wildlife in the area. Look for tracks and signs of animals, as well as things like insect nests.
- Know your directions and which way the prominent winds will come from. You want your shelter to be protected from wind and rain, yet get the morning sun.
- Weaving is an important wilderness skill to know for making a good shelter door.
- You can create extra rain protection by using bark to create a shingle effect on your wilderness survival shelter.
- If you have one with you, a wool blanket can serve many purposes, such as a blanket cape coat, a sleeping bag, a layer between you and the ground, or a wilderness survival shelter door.
All of this may sound like a lot to remember so I’m offering a FREE Bushcraft Skills: Wilderness Survival Shelter Checklist, which you can keep in your pack in case of emergency. Or, you can use it to memorize and practice until you’re confident in your wilderness shelter building skills!

Learn more about WHY a wilderness shelter is so important and other wilderness survival skills at the author’s website here: https://earthworkprograms.com/
About the Author: Wilderness Guide and Survival Instructor, Frank Grindrod, has been dedicated to teaching earth skills since founding Earthwork Programs in 1999. Some of his focuses include nature awareness, tracking, wilderness living skills and earth philosophy. He is a graduate of Greenfield Community College’s nationally-recognized Outdoor Leadership Program. Frank maintains his own education studying with respected mentors; Tom Brown, Jon Young, Paul Rezendes and others. He has been trained as a Wilderness First Responder and is a certified facilitator for the Nurtured Heart Approach.
As an Advance Trainer of the Nurtured Heart Approach, Frank has studied with national trainers including Gabrielli Lachiara, LSW., Lisa Bravo, Tom Grove and Howard Glasser, MA. He is recognized as an advanced trainer and coach with energy parenting and Howard Glasser’s, The Inner Wealth Initiative and the Children’s Success Foundation.
Frank is currently working as a professor at Smith College, a lead facilitator of wilderness education programs and the Nurtured Heart Approach, as well as consulting for camps, museums, conferences, schools and environmental education centers throughout New England.
Learn how to Build a Debris Hut Survival Shelter!


No Comments