

A Guest Blog Post by Aaron “Hutch” Hutchings

Imagine if everything you carried was easy to transform into another piece of gear. What if you could use a few pieces of fabric and a couple of well-placed, easy knots to replace broken gear, improvise packs and bags in a pinch, or even customize haversacks, backpacks, beach bags, belt pouches, and other bags to your personal body type and adventure needs?
While serving in the Marine Corps, I lived in Okinawa, Japan for several years and was fortunate to have a job that put me in direct contact with local nationals. I was fascinated by the many, intricate ways that they wrapped gifts, lunches, packages, gear, and deliveries. It was not uncommon to see someone walking down the street with their groceries, or some other heavy burden, safely contained in a piece of fabric. While attending some college classes I had a tutor that worked in a Furoshiki shop during the day. She would show up to our sessions in clothes made from sheets of fabric and knots that rivaled some of the most attractive clothing I have ever seen. She also carried all of our study gear in different types of bags made in the same fashion. One of my favorites was what I call the “Okinawa Haversack.” She would untie one knot, roll the bag out with a bit of a flourish, and we had a ready-made study area. The cloth contained all her books, pencils, note cards, a small chalk board, and other study materials. We could comfortably sit on the blanket, picnic-style, protected from moist or sandy ground, and did not have to worry about damaging books or losing items in the grass. When she was done, the study material was placed back on the blanket, and with a few quick folds and one knot and she was off to her next adventure.
I was so impressed with this style that I began to study Furoshiki and other forms of cloth bending from indigenous peoples around the world: the bags of the Maasai warrior, Sarong and Pareos-style skirts, the rebozo materno dating all the way back to the Mayans, and many more. All these forms use just a bit of fabric and a few simple well-placed knots to create something useful from the most basic of materials. It was all so cool! Maybe it is the sheer practicality of it, maybe it is the fond memories of my time in Japan, or maybe it is my love for the Indiana Jones movies, but for whatever reason I still find the Okinawa Haversack to be one of the coolest and most useful tricks in my arsenal.
To get started, your choice of fabric is just about limitless. This bag can be tailored to the size of your gear. Generally, the length of your object is approximately one-third the diagonal of your fabric. In the examples I will be using a normal sized handkerchief from Hobby Lobby, for short adventures I tend to use a Shemagh, and for my study trips I like to use a five-foot by five-foot piece of wool blanket that I acquired from a thrift store. Just keep in mind the size of the items you are packing, and the size of the work area you want when your fabric is unfolded. For example, my fire kit only needs to be large enough to keep everything dry, a fishing kit or art kit only needs to be big enough to sit on, and my study kit turns into a full-on picnic sized area that I can spread out and lay on, if I desire. Once you have decided on size, then the only other requirement is that the fabric will be able to form a knot without too much difficulty. There are many different sizes of material out there. Materials like silk and rayon tend to have more give and can be cut smaller; thicker fabrics with less give will end up a bit bulkier and tend to need to be just a bit larger in their dimensions. A great way to pick sizes is to find an old bed sheet or other thin fabric and cut three squares out of it. The dimensions should be about 12 inches by 12 inches, 34 inches by 34 inches and 5 feet by 5 feet. These will give you a pretty good idea of general sizes you’ll need for the different items you may want to pack. Then you can head to the fabric or thrift store and pick any fabric that you think will be strong enough for whatever you are carrying. Experiment with different types of fabrics. There are even many cool waterproof fabrics out there now that are great for keeping one dry while sitting on wet or snowy ground.
THE KNOT
Ceremonial Furoshiki has some amazingly beautiful knots, but I have found that, for practical applications, we can replace most of them with either the basic square knot or an overhand knot. For this application, we will be using the square knot. You may remember the old rhyme from your childhood: “Right over left and left over right makes a knot both tidy and tight.” The square knot works either as right over left, left over right or left over right then right over left. You may use one method over the other, depending on the angle you start from, but to make sure that the knot holds under weight for your whole adventure—and unties when you need it—make sure you tie it correctly.
TYING
First, Choose two corners and hold one in each of your hands.

Then, place the corner in your right hand over the corner in your left hand, then under the portion in your left hand. Now pull.


Next, take the corner that is now on the left and place it over and under the new right corner. Now pull and tighten your square knot (Note: Reverse if coming from the other direction).


UNTYING
Most people I meet can tie a square knot, but many do not know that there is a nifty trick that will “break” or untie the knot even after it has been cinched down by significant weight on a long hike. So much of the Okinawan culture was based on elegance, flourish, ceremony and grace. The art of Furoshiki taught me that every knot has a trick that will let it come undone easily and should make you look truly good while untying your wraps.
Start with with a square knot and pick a corner. In this example, we will pick the tail on the left side of our knot. It does not matter which side you start on.

Next, while holding the fabric underneath the left tail with your left hand, grab the left tail with your right hand.

Once you have this tail in your right hand, pull it over the knot to the right side.

The secret is to pull the knot hard enough to straighten out the fabric between your hands. Now, grasp the entire knot in your right hand.

Finally, pull the fabric out of the knot with your left hand. It should slide out easily. If it does not, go back to step 2 and repeat.

TAKE MY ONLINE COURSE: OUTDOOR FUROSHIKI: THE ART OF FOLDING YOUR OWN PACKS & POUCHES FROM FABRIC
Learn how to apply the art of Furoshiki (Japanese Scarf Bending) to make 6 different improvised packs, pouches, and haversacks for survival or outdoor adventure. Make functional outdoor bags and packs using only square pieces of fabric & knots.
THE WRAP
The Okinawa Haversack finished product looks complicated, but in truth, it is rather easy to accomplish. As mentioned, I use it at different scales to keep my adventures compartmentalized, organized, and comfortable. To practice it is easiest to start with two rectangular items that are the same size, say two books or decks of cards. With time you will find that your items can be different shapes and sizes and still be wrapped with ease. If you are packing heavy items, consider using a stronger fabric, just leave a bit more room between your items to make up for the thickness.
First, find a mostly flat area to work, (the ground or couch cushions work great), then lay the fabric as a diamond, with the “ugly” or “wrong” side of the fabric facing up.

Next, lay the items on each side of the diagonal line of the cloth. This step and the next are not necessary with items of the same size, but it is a great way to ensure even wraps, if you start using items of different sizes.

At this point, you want to flip each item toward the corners. Count the flips as you go. Now, you will know how many times different sized items must be flipped to get back to the correct center position. This way items of different sizes will end up tightly wrapped and in the exact position necessary for this bag to be carried with no concern of coming undone.
Place the corner of your fabric over your items.

Roll the items in the fabric by flipping the items back to the imagined diagonal line. With items of different sizes, you will fold the number of times counted in step 4. Over time, you wont need to count, you will just be able to eyeball the correct position. Different fabrics require different spacing, but I have found one to two fingers of space is good for most fabrics, a bit more with something thick, like wool blankets.


Next, pull the top and bottom corners towards each other and cross them, pulling tightly so that the fabric begins to line up in the space between your items.


Then, fold the item on your right over and onto the other item and flip the entire package over.


Pull the two tails to tighten everything up.

Finally, tie the tails together using a square knot. If you used larger fabric you will have a nice shoulder strap, if you do not need a shoulder strap you can use smaller fabric or cinch down on the knot to make a secure package.

If you have smaller fabric and need a longer strap you can simply tie another piece of fabric to the two tails using the square knot. I use this method often when using two shemaghs.

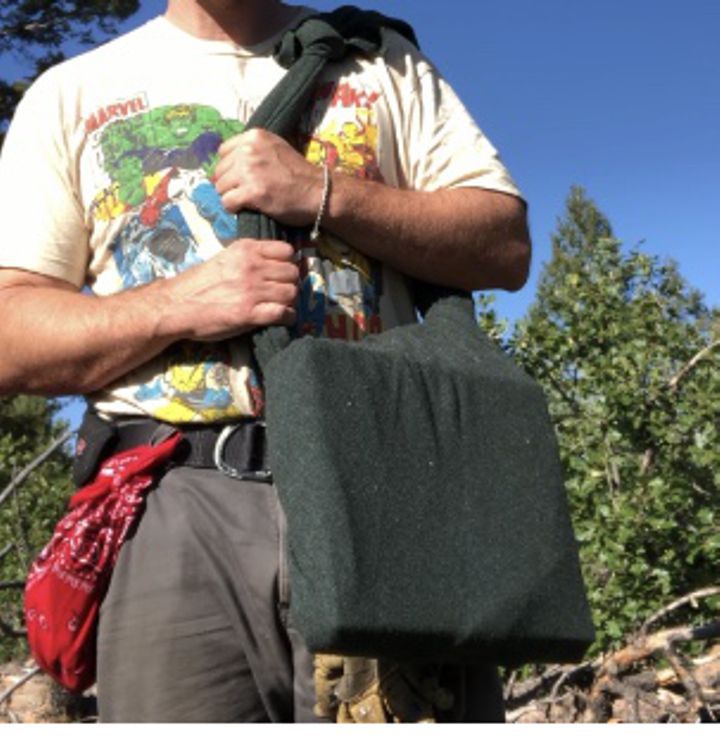
This bag is harder to explain than it is to use. Hopefully, the pictures will walk you through the process and you’ll end up with a nice, tight haversack. Now that you have mastered the mini version, detailed here, it’s time for you to try this to scale and make a haversack that first you! I also shot a short, quick video that goes through the folds needed to set this up with a small fire kit and Esbit stove:
Thank you so much for your time, do not forget to customize your fabric to your interests and adventures. I have found some great patterns for extremely cheap in the remnants section of hobby stores, and there are countless treasures at local thrift stores.
I would love to hear what types of things you pack, and any cool innovations or fabrics you find. Whether your adventure is around campus, taking off to the back country, or simply packing an elegant gift, stay safe out there, and keep on adventuring!
P.S. If you like what you see here, I can take you further! Take my course OUTDOOR FUROSHIKI: THE ART OF FOLDING YOUR OWN PACKS & POUCHES FROM FABRIC here: https://www.outdoorcore.com/courses/outdoor-furoshiki
Aaron “Hutch” Hutchings is a survival instructor and outdoor educator. His love for adventure was first sparked by his grandfather’s teaching and stories. This spark was blown into flame in the Boy Scouts and fanned to a full-on bonfire in the Marine Corps. The only thing Hutch likes more then adventuring is helping others start down their own path. Learn more about Hutch on his blog at: http://www.hutchsadventures.com


5 Comments