
A Guest Blog Post by Jim Ausfahl
Disclaimer: This material has been modified from the public domain US Military field manual, FM 5-80.
As a reminder, the triangle bandage is a piece of cloth, often unbleached muslin, that is a right triangle with legs about 40″ (102 cm) long, and a hypotenuse, or long side, around 56.6″ (144 cm). It is folded on itself three times to make a cravat bandage. Remember: for all wounds, the first thing to do is to control the bleeding, clean and cover the wound with gauze padding, and if it is available, some antibiotic ointment. The bandage is used to lock the gauze in place. In looking at the bandaging below, it will be assumed that has already been done. This week let’s look at bandaging parts of the leg, which is very similar to bandaging the arm.
THE FOOT
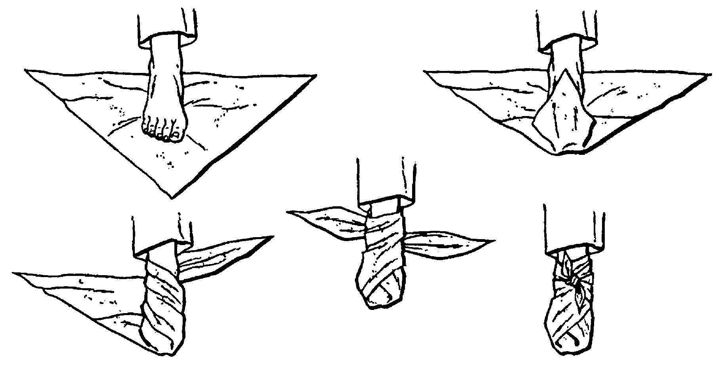
First, the foot. Lay the triangle bandage on the ground, planting the injured foot on it so that the middle toe is pointed toward the right angle of the bandage, leaving enough bandage behind the heel to come up a little bit on the ankle. Fold the right angle of the bandage over the top of the foot, tucking the side of the bandage under the sole of the foot a little bit to take up the extra material around the foot. Bring one of the corners of the bandage over the foot and behind the ankle, then bring the other end around the other side and behind the ankle. Doing this will cause the part of the bandage behind the heel to come up over the heel; if it does not, lift it up and lock it in place. Then, anchor the bandage by tying a square knot on the front of the ankle. The figure below shows how this is done clearly.

THE KNEE
Having taken care of the foot, let’s move to the knee. Step one is to fold the triangle bandage into a cravat. With that done, put the middle of the cravat on the kneecap. Take one end of the cravat behind the knee then around the lower part of the knee. Take the other end, come around behind the knee and in front of the lower leg, right under the kneecap. Lock the bandage in place by tying a square knot behind the knee. Here is a simple diagram:

THE LEG
One bandage left, bandaging the leg. The figure below will show bandaging the lower leg, or calf area, but the same technique will work for the thigh, if the thigh is not too large. As with the arm, the triangle bandage needs folded into a cravat. Place the middle of the cravat behind the leg, bringing one side around the front and wrapping upward, then bring the other side around, wrapping downward. This is very much the same as bandaging the arm, and the figure below makes that clear.

These are the easiest things to do with the triangle or cravat bandage. Next time we’ll look at something a little more challenging—bandaging things on the head and face.
Jim Ausfahl is a physician in active medical practice, in Peoria Heights, Illinois, studying the art of surviving in a challenging environment and sharing what he knows.


![Best Online Survival Courses [even a FREE one]](https://i1.wp.com/willowhavenoutdoor.com/wp-content/uploads/2020/11/best-online-survival-course-1.jpg?resize=150%2C150&ssl=1)


1 Comment