
Guest Blog Post by Tim Webb CCEMT/P, WEMT/ P, US Army SFC (ret)

Ah, the seemingly innocuous blister. We’ve all seen them, likely we’ve all had them, and even more likely we have all been crippled by them at one time or another. When you look at the hierarchy of medical problems that can kill you in the back country, blisters aren’t very high up on that list. However, they are one of the most common problems encountered. My bet is that the first human beings, thousands and thousands of years ago, that strapped some kind of footwear on started suffering from blisters soon there after.
While not threatening in and of themselves, blisters can absolutely become an issue that can put your life at risk. Blisters can cause pain and slow you down, if not stop you completely. They are prone to infection and long-term issues if not promptly fixed and the pain and discomfort alone is enough to cause you to change the way you walk. Potentially putting you at risk for orthopedic injuries including falls, sprains, and strains.
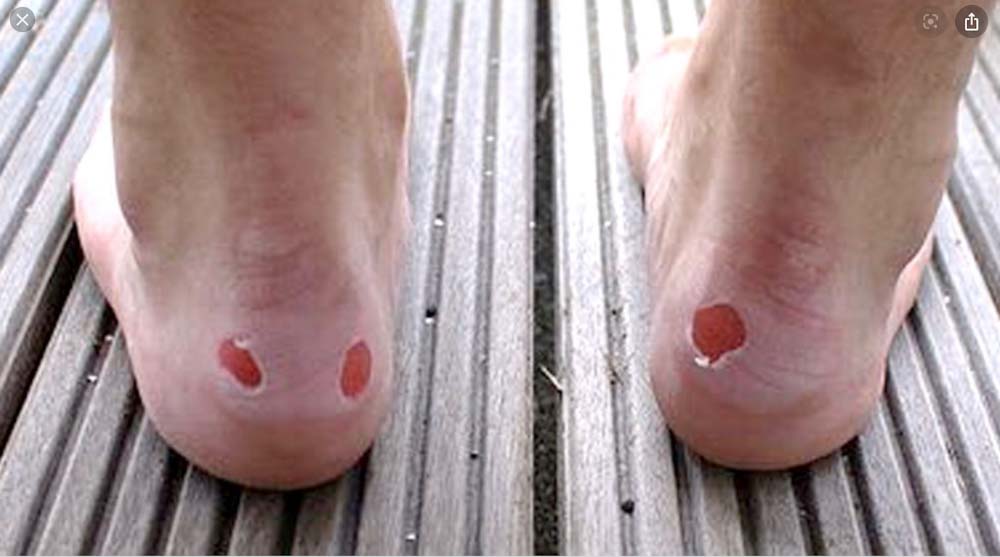
Most of us, whether we are in the back country or in an urban environment, have experienced blisters in one form or another. Some are just a minor annoyance, while others that involve very large areas. Technically speaking, blisters are formed when frictional forces mechanically separate layers of skin, allowing fluid into the void. Blisters can have clear fluids which likely means only superficial damage. Red blisters indicate either deeper tissue or vasculature involvement.
There are three things that have to happen for a blister to form:You have to have heat, moisture, and friction. If you can stop any of those, you can likely prevent blisters. I call these three elements THE BLISTER TRIANGLE Let’s take a look at these three individually:

HEAT
Heat can be caused both by external forces (warm environmental temperatures) and by physical exertion (body heat). As our bodies heat up and send warm blood to the periphery, skin temperatures increase. Unfortunately, there is really no way to control this. Even with really cold temperatures outside, inside your footwear the skin can still heat up. So we can’t really control heat.
MOISTURE
Moisture on the skin can happen due to both environmental and physical causes. Moisture from outside sources in forms such as snow, ice, and rain and physically from heat/sweat. The moisture causes clothing to stick to skin. Again, this is almost impossible to control. Gore-Tex boots and other high tech fabrics like moisture-wicking materials help, but none can completely eliminate the possibility of moisture building. When we have heat, we most likely have moisture. Moisture makes the sock stick to your foot. Once that happens, the sock doesn’t freely move over your skin. Instead, it sticks to your skin. The skin layers then slide, which is where the blister starts to form. So that leaves us truly with only one way to break the blister triangle–eliminate friction.
FRICTION
Friction is the only one of these three blister-causing elements that can be completely controlled. If we recognize that we cannot control heat and moisture, then we need to concentrate on controlling friction. Controlling friction is the key to both prevention and the treatment of blisters.
There are many different ways to treat blisters. Most people that have dealt with blisters typically have their own way of preventing and treating them. Some are really effective and others aren’t very good at all. Most of the techniques I’ve seen or heard of are geared towards eliminating friction. Rightfully so.
ELIMINATING FRICTION–WHAT WORKS
In my almost 30 years of pre-hospital and wilderness medicine, I’ve seen and heard of an amazing amount of things people do to prevent and treat blisters. Anything from using Superglue injected into the blister to smearing Vaseline over their entire foot in an attempt to prevent friction. In the early years of my military career, it wasn’t uncommon for me to use about half a bottle of foot powder in each boot, thinking that would keep my foot dry. Literally, I would squeeze it into this sock and shake the sock until a cloud of powder came out. Obviously, that didn’t work. I still got some horrible blisters. Why? Because I tried controlling one of the sides of the blister triangle that simply cant be controlled (moisture). We’ll talk some more about foot powder later. Remember, foot powder doesn’t help at all with heat or friction. It’s meant to keep the foot drier, but due to its composition, it tends to form small little balls as it pulls in moisture. These little foot powder balls then grade against the skin and apply more friction, not less. The more foot powder, the more likely blisters will form. I learned some very painful lessons through my early years of military service.
CHOOSING PROPER FOOTWEAR–PREVENTING “HOT SPOTS”
So now we know, of the 3 major components that cause blisters, friction is our best bet to break. Obviously proper fitting footwear is a key, however with that said even the best fitting footwear can shift in rugged terrain causing “hot spots” and eventually blisters. On straight, flat terrain, even poor fitting footwear can be fine. On uneven, rocky, or root-filled terrain, where your foot slides back and forth in your shoe/boot no matter how well your shoes fit, you could be in trouble.

Socks can be part of the problem as well. Drooping socks, socks that don’t wick moisture or socks not fit properly to your foot all can cause issues. On a recent 30 mile backpacking trip to the West Rim Trail in Pennsylvania, I developed a blister on my heal in boots that I’ve worn for years, boots that I never had issues with before. The most likely candidate–a drooping sock with a lot of small debris in my boot, due to not wearing gaiters. Friction, friction, friction.
When it comes to socks, there are some really fantastic products out there. Some brands now have socks that are double-walled with moisture-wicking or hydrophobic fabrics. Some hikers still prefer to wear a very thin liner sock and a thicker sock for cushion, which is a time-tested approach that works well. These techniques, whether it’s a double walled anti-blister sock or a liner sock of some sort, are beneficial because they can help break the friction cycle. The inner liner sticks to the foot and the friction happens between the sock and the liner, not your skin.
You can use a very light coating of foot powder or even antiperspirant applied for weeks prior to a trip in an attempt to cut down on the moisture or sweat that’s produced. While these steps are prudent and make sense, it still won’t control external moisture or even completely control sweat production, and it still does nothing to control friction. Another technique I’ve witnessed from others doing medical coverage for long term adventure races is Vaseline coating the entire foot. Some swear by it. Personally, I’m not sure I’d like that feeling on my foot. There are some new anti-chafing products out on the market that actually preform better when heated up. These show a great deal of promise and make sense. Especially when used in combination with a double-layered anti- blister sock.

BLISTERS BECAUSE OF SWOLLEN FEET
Another factor often underestimated is swelling or edema. On any hiking trip or extensive workout, your feet are going to swell, particularly in a warm or hot environment . It’s physiologically impossible to stop it–because of gravity. Your core warms up, your body pushes blood to your periphery to cool it, the vessels become engorged, allowing blood to pool there and before too long you have swelling. Have you ever walked a long distance or worked out hard and noticed your rings or watch seem to fit tighter? It’s the same principle. Even with well-fitting footwear, swelling can cause problems.
PRE-TREATING/PREVENTION OF BLISTERS and HOT SPOTS
We all learn through experience. If you know you’re likely to be prone to blisters or you’ve gotten them before, then a really good idea is to pre-treat those areas prior to going out. We’ll discuss some treatment ideas shortly but pre-treating as a means of prevention is ideal. The adage of “an ounce of prevention is better than a pound of cure” is certainly true with blisters. I have a good friend that, no matter what she does, she gets blisters in certain spots. Many of you can empathize with that and would tell a similar story. So now, the night before a trip or hard workout she applies a treatment to those known spots and is fine. Problem fixed.

Earlier I referred to “hot spots.” Most have probably heard the term before, but for those that haven’t a hot spot is the beginning of a blister. Let’s just call it a warning sign of significant trouble ahead if it isn’t cared for quickly. If you were to stop and observe your skin where you feel the pain, you’d actually see a reddish discoloring or inflammation of the affected area. Typically, it’s a little painful to the touch and may have some skin tissue starting to deteriorate. It indicates friction is being applied to the layers of skin and a blister is about to fully form. Fortunately, it can sometimes be fixed by simply adjusting a sock or pulling out debris that’s gotten into your footwear. However, it’s more likely it’s going to take actual treatment. The good news is that hot spots do not have to turn into blisters. If you take the time to fix them, you can prevent a full-on blister from forming
I think something that needs to be pointed out here is that the tendency for some of us to be a bit lazy, myself included. We want to push on, we don’t stop and check if a blister is starting to form. We feel the burn and think, “Ah we’ll be stopping soon, I just put these boots on, I don’t want to hold up the group.” Of course there’s legitimate reasons why you can’t stop, but the point here is that you really want to stop as soon as you can, investigate and treat the hot spots before it becomes a real issue. If you’re involved in guiding a group or a leader in any way, I think it’s a great idea to stop a couple of miles or hours into an event and have everyone check their feet, especially when it comes to kids. I’ve been guilty of not stopping myself and have paid the price for it. Trying to clean the area, drain a blister, prep and dry the skin, apply a dressing and other treatments will take far longer and delay you a lot more than if you just treat the hot spot.

TREATMENT
Treatment and prevention go hand in hand, and both start with eliminating friction from the equation. There are multiple ways to accomplish this, and many, many products on the market to assist you–some good, some not so good. Most of you have your own way of treating blisters, and if it works that’s perfect. Stick with what works for you. I’d love to hear about your techniques. But for those that are looking for help, here are some ideas that may be helpful:
First, obviously start with footwear that fits well, but remember, terrain determines whether or not you get blisters. I would suggest trying socks that are designed (double-layered) to help prevent blisters or add a very thin liner sock. Choose socks that are hydrophobic and not a 100% cotton blend. Cotton, while possibly slightly cooler, will hold the moisture and not wick it away from the foot. At night or on prolonged stops, get your feet out of the boots and let them dry out, elevating your feet can help decrease swelling in the short-term.
Mole skin and mole foam are the tried and true methods from years ago. Cutting the mole skin/foam so that it surrounds the blister and provides protection for the blister is simple. However, neither mole skin or mole foam are meant to cover the blister. They can form a protective barrier around the blister, but they won’t help if the blister expands. It works, but personally, I’ve moved away from it. I think there are better ways of managing. On occasion, while treating a major blister on the bottom of the foot, I’ll use it in conjunction with other treatments.
Anti-chafing products can work well as a prevention measure, but as a treatment technique have limited uses. These products are common, inexpensive, and work really well as a pre-treatment and sometimes help in conjunction with treatment. For instance, I’ve used these anti-chaffing products over top of a piece of duct tape that I’ve placed. In combination , this can be a game changer.
I think duct tape works really well, provided you use good, quality duct tape. Not all duct tapes are created equally and the glues used are vastly different. There are medical grade tapes that can be used as well, but they tend to be expensive and hard to find. I haven’t found many cloth tapes or other medical grade tapes to be very effective. Most medical products are not geared to take the heavy pounding we would apply to them, so your money is better spent on products that have multiple uses. The reason why duct tape is so effective is because, once it’s applied to the skin, it allows the friction to take place between the sock and the duct tape and not sock to skin. Typically, I’ll cover the blister itself with a dressing, a band aid or a small piece of gauze first and then apply the duct tape over the blister. Ensure that the duct tape is applied smoothly onto very dry skin. It’s also a good idea to curve the edges of the duct tape so that the edges won’t peel off. The key is to take the time, dry the skin, and apply the duct tape as smoothly as possible.
If using any type of tape around toes or fingers, be careful to NOT circumferentially wrap the digit. Tape applied too tightly can cause circulation issues and in freezing temperatures can lead to frostbite.
SHOULD YOU DRAIN YOUR BLISTER?
To drain or not to drain is the question. My advice here is to drain the blister. I understand the argument that by opening up the skin you risk infection, but I think that’s a minimal risk. The pressure and therefore the pain would be a great deal more if that blister remains intact. Eventually, the outer layer of skin will break and tear regardless, so a controlled drain the serous fluid, relieves pressure and offers the intact skin underneath the blister protection. Drain the blister with a clean needle, either a hypodermic needle (see blister kit picture) or clean safety pin. When you insert the needle, think gravity. This will assist in draining the serous fluid from the blister and then allow it to naturally drain while on the move. Cleaning the blister prior to and post drainage with soap and potable water or an alcohol prep pad should minimize the risk for infection.

COMPEED–AUTHOR’S RECOMMENDED TREATMENT
After years and years of trial and error, both treating others’ blisters and my own, the single best treatment I’ve found is a product called Compeed. I was introduced to this by a seasoned Himalayan climber years ago and have never looked back. It really is amazing stuff. It sticks well, provides excellent protection, comes in many sizes, is inexpensive. I allows the serous fluid to drain directly into the dressing and it is safe to leave on for days. I have used Compeed in many different climates and conditions from cold Michigan winters to hot, humid desert climates and everything in between. There are other brands that make a similar product but Compeed’s glue is simply superior to anything else I’ve tried. Compeed is listed on Amazon for various prices and package deals.
Compeed’s dressings act like a second skin. They’re designed to help aid in healing the blister, act to provide a friction free area, have a cushion that actually expands a bit as the blisters release fluids and help tremendously with pain.The glue is remarkable and as long as it is applied to dry skin, it can stay on for days. Literally I’ve had these dressings stay in place on patients in very damp environments for over five days. Compeed deserves a place in everyone’s first aid kit and even in their EDC kits.

In extremely wet environments adding Tincture of Benzoin (see blister kit) will help the glue stick better. The key to using Compeed is to apply it to warm, very dry skin. Once smoothly applied to the skin, rub the dressing to warm the glue and it’ll be on for days. The dressing is designed to start to peel at the edges so that you know it’s time to remove the dressing.
I have nothing to disclose with Compeed. I don’t make any money from them at all. Despite that, I have absolutely found their products to be the best on the market. Use it both to treat and to prevent blisters. Pre-applying to blister prone areas can prevent blisters. Once a hot spot is felt, stop, and remove the shoes and socks, clean the area, dry it and apply a Compeed dressing. It can prevent a blister from forming.
HOW AN EMERGENCY MEDICAL EXPERT TREATS BLISTERS
Here’s how I typically treat blisters:
- Identify the hot spot or blister. If needed, clean and drain the blister.
- Clean and dry the site again after draining.
- Apply a Compeed dressing to warm, dry skin.
- If the environment is very wet, I may use Tincture of Benzion applied directly to the skin, prior to placing Compeed.
- If the area of the blister is in a maximum friction area, I may apply duct tape over top of the Compeed as a protective covering.
- Wait for the dressing sides to peel. Remove, clean, and reapply as needed.
Again there are many, many ways to treat and prevent blisters, the key truly is prevention. Stop, check your feet and the feet of your companions and treat as soon as there’s an issue. DON’T WAIT–I cannot stress that enough. Stopping early and taking the time to fix things before it really becomes an issue is immensely important. The adage “pay now or really pay later” applies here. Treat early before it becomes a potential evacuation issue.
AN EMERGENCY MEDICAL EXPERT’S BLISTER KIT
Hers an example of what I may carry in a blister kit:

You’ll note in the picture a small pair of tissue scissors. Quite frequently, wound debridement may need to occur, especially in large blisters. Having a good pair of tissue scissors will be invaluable.
FINAL THOUGHTS
We’ve talked a great deal about blisters to the feet. Granted that’s the most likely scenario, but friction blisters can occur in other places on the body as well. Most commonly on the hands and more likely from a repetitive motion without wearing protection, such as gloves (i.e. cutting firewood). Treat and protect these blisters the same way you would on the feet.
While usually just a painful annoyance, blisters can become a serious safety concern. So much so that evacuations and serious safety issues can occur, putting not only the individual but potentially the whole group’s safety or ability to complete their task at risk. For the most part, blisters are preventable and easily treated if caught in time. Avoid the painful nightmare of blisters by being proactive rather than reactive and your time in the woods or walking on a city street will be much more enjoyable.
Tim Webb CCEMT/P, WEMT/ P, US Army SFC (ret) is a 30 year wilderness and urban prehospital provider. A senior Instructor with Remote Medical Training, holds a Fellowship from the Academy of Wilderness Medicine from the Wilderness Medical Society. A formal tactical medic working with local and federal SRT teams. He served with the US Army for 22 years as a medic including tours during Desert Storm and Operation Iraqi Freedom. He has also traveled to Afghanistan with Wilderness Medical Associates to teach the US Army’s famed 101st Airborne Divisions medics wilderness and remote medicine. He currently works as a Critical Care Paramedic with American Medical Response in West Michigan.


1 Comment