
When it comes to the question” How to Start a Fire with the Bow Drill,” the devil is truly in the details. Below are 7 Expert Tips that you’ll rarely hear when researching how to start a fire with the bow drill. These tips come from years of experience in not only teaching people how to start a fire with the bow drill, but also recognizing patterns in why people fail. This article is a great supplement to the 3 resources below that I have already created to help you learn how to start a fire using the bow drill. Be sure to read/watch those if you already haven’t. The 8 tips below will make more sense after reading and watching the below articles and video.
Resource # 1: HOW TO CHOOSE THE BEST BOW DRILL WOOD: https://willowhavenoutdoor.com/fire/best-wood-for-bow-drill-how-to-choose-the-perfect-wood-for-your-friction-fire-bow-drill-kit
Resource # 2: HOW TO MAKE A BOW DRILL KIT: http://www.creekstewart.com/creek-stewart-survival/how-to-make-a-bow-drill-kit
Resource # 3: BONUS VIDEO: BOW DRILL TECHNIQUE OVERVIEW (WATCH VIDEO BELOW)
FREE Carving Template! Enter email below to download my Bow Drill Carving Template:

This carving template will be a great resourse for you when learning how to make a fire with the bow drill! Enter your email for an instant download link!
Expert Tip # 1: TAKE NOTE OF YOUR LOCATION
So many people fail because they don’t take the extra couple of minutes that it requires to find a nice flat spot. Perform the Bow drill on a flat, dry (if possible) surface that is protected from wind. Going for ember on a slope or in a wet, marshy area can cause all kinds of problems – from incorrect body positioning and fatigue to poor technique and snuffing out an ember entirely. You can use a large, flat rock as a working area if the ground is wet or damp. You’d be surprised how the bow drill success rate improves when someone is just starting out on flat ground!

Expert Tip # 2: DON’T CARVE YOUR DIVOT TOO CLOSE TO THE EDGE OF YOUR HEARTH BOARD
One mistake I often see when learning how to start a fire with the bow drill is starting with your divot too close to the edge of the hearth board. The divot is the small depression that your spindle seats into while spinning for ember. If you start too close to the edge, the spindle will want to jump out of the notch as it burns in. A good rule of thumb for where to start your divot is this: Measure the width of your spindle at it’s thickest point and make the center of your divot this distance back from the edge of your hearth board.

EXPERT TIP # 3: Pencil versus Hot Dog
If you can visualize what the tip of a pencil looks like and what the tip of a hot dog looks like then you can carve a proper bow drill spindle. The top of the spindle should be carved like the sharp tip of a pencil because we want as little as friction as possible at the top when the spindle is rotating in the bearing block. The bottom should be rounded like the tip of a hot dog because we want increased surface area and friction to build out our ember. When learning how to start a fire with the bow drill, it is very important to remember this principle.


EXPERT TIP # 4: THE TIP OF YOUR NOTCH SHOULD BE IN THE MIDDLE OF YOUR DIVOT
After burning in your divot and seating your spindle, it’s time to carve the notch which will collect the dust that ultimately becomes your ember. Understanding where and how to cut this notch is a critical piece when learning how to start a fire with the bow drill.
Start by imagining an average slice of pie. Don’t worry about dimensions and measurements. Just picture an average slice of pumpkin pie in your mind. Most people know what an average slice of pie looks like. Now, carve that shape so that the tip of the piece of pie lands right in the middle of the divot on your hearth board. Not to the edge, not to the back, but right in the middle. Draw the notch with a pencil first if you need guidelines.
Having made a fire with the bow drill 1000s of times, I’ve found the perfect placement for the notch is with the tip landing directly in the center of the divot. It provides the perfect balance of dust collection and surface area friction and this method will eliminate many troubles in your learning of how to start a fire using the bow drill.

Below is an illustration of a hearth board to give you an idea of how the notch should be carved. Notice the tip of the notch touches the center of the burned divot. The notch isn’t too skinny and it isn’t too fat. A FREE download of this carving template is provided at the beginning of this blog article if you missed it.

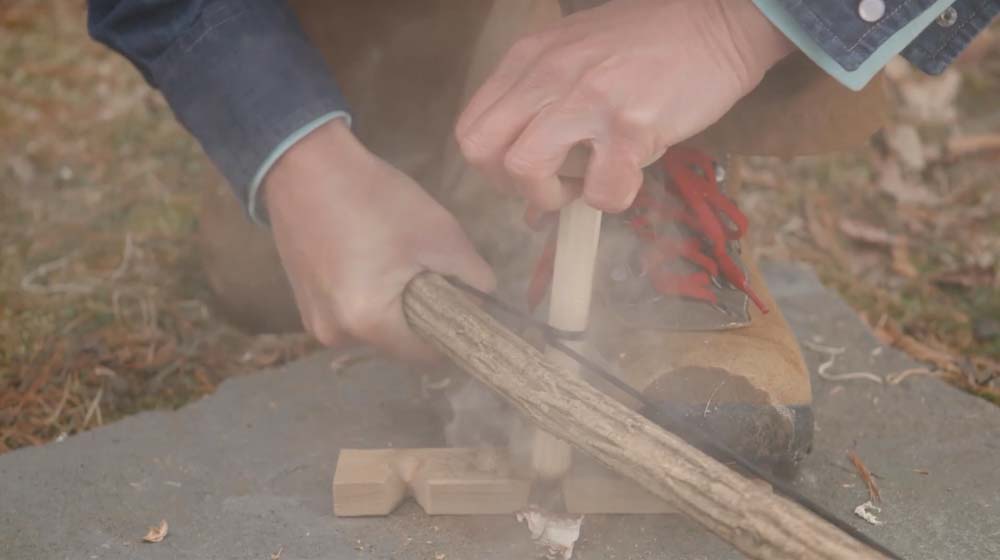
EXPERT TIP # 5: PIN THAT WRIST
When it comes to bow drill technique, there are few aspects as important as stabilizing your wrist that holds and supports the bearing block on top of the spindle. If this wrist wobbles, you are almost certain to fail, especially when learning how to make a fire with the bow drill in the very beginning.
While I cover this extensively in the video posted at the top of this article, it’s so important that I wanted to cover it again here. Notice in the photo below how the crook of my wrist (the joint between my hand and forearm) is firmly pinned against the front of my shin. Pinning your wrist in this position extends the stability of your leg through to your wrist.
The spindle undergoes quite a bit of stress and motion while drilling and even the most experienced bow drillers will fail when trying to hold the spindle without pinning their wrist. I’ve literally watched 100s of people fail because of this and then successfully get an ember once it was corrected.

EXPERT TIP # 6: GROW YOUR EMBER
When first learning how to make a fire with the bow drill, this is one of my most invalauble expert tips. Fire isn’t achieved with the bow drill until an ember is placed into a tinder bundle and blown into flame. I can’t tell you how many times I’ve seen students get an ember yet FAIL to take it to flame.
BIGGER EMBERS ARE ALWAYS BETTER!
Every time I make a fire using the bow drill, I take a few minutes after busting out my ember to GROW IT. I do this using an EMBER EXTENDER material. Most often I’ll use punky wood, which is simply dry rotting wood that you can crumble between your finger tips. By sprinkling powdered punky wood on top of a smoldering ember, you can grow the ember to be much larger and capable of being moved into a tinder bundle. In fact, you can create a “back-up” ember with punky wood just in case you fail to blow your tinder bundle to flame on the first time.
When you’ve gone through all of the effort to carve a bow drill kit and spin out an ember, don’t rush and blow it right at the last minute. Take a breath and grow your ember to about the diameter of a quarter and it will make creating FIRE so much easier!

EXPERT TIP # 7: CREATE A “CORE” IN YOUR TINDER BUNDLE
Successfully busting out a Bow Drill Ember and making a good tinder bundle are actually 2 different skills you must master when first learning how to start a fire with the bow drill. The quality of your tinder bundle is just as important as your ember. Everything else can be perfect and you can bust out a Big Fat Ember (BFE), but if you have a crappy tinder bundle you will likely fail at actually making fire. I’ve seen it happen 100s of times.
My biggest tip for when making your tinder bundle is to build it in 2 stages. The first stage is from your rougher material, like grasses, shredded bark, etc. This is the EXTERIOR of your tinder bundle that really starts to produce some flame when the fire starts. However, it’s important to build what I call the “CORE” to your tinder bundle. This is made from your BEST OF THE BEST tinder material. In courses, we use shredded jute twine because of it’s fine consistency. In the wild, you’ll use the finest, driest material you can possible find. You want to choose tinder that has the best chances of converting that ember into flame when blown. Once this tinder catches flame, it will ignite the exterior, slightly larger, tinder and your tinder bundle will be nearly unstoppable at that point.
When it comes to tinder bundle size, I like to build tinder bundles about the size of a football, with my core being about the size of a tennis ball.


CONCLUSION
With the resources I posted at the beginning of this article and the bonus tips I’ve just shared, you’ll be well on your journey to learn how to start a fire with the bow drill. My best advice is to download the free carving template that I provide in this post and then go to Lowes or Home Depot and purchase some rough out cedar trim boards to carve your kit. You can find them in the trim department and I always by the 2″ x 8′ board when teaching new students to learn how to start a fire with the bow drill.
Post your comments, questions, and ideas and I’ll do my best to help you in any way that I can. If you’d like to pick up on of my premade Bow Drill Kits, you can buy one of those at the link below:

Creek’s Take Down Bow Drill Kit
Click the link below to purchase:
http://www.creekstewart.com/skills-kits/izsmzi96jdp39x22dl12vd3ht4qmqa


No Comments