
This is a guest Blog Post by Kevin Luebke
For those with an outdoor or wilderness survival mindset, knowing how to clean a leather belt, knife sheath, leather boots, or any other outdoor leather product is an important skill. Cleaning is just one of 5 important, yet simple steps in leather care to ensure all your gear performs and lasts.

Cleaning your leather goods is just one of 5 simple yet important steps in ensuring your leather goods perform and last.
In this article, I’ll detail the 5 steps you need to know in order to properly learn how to clean a leather belt and virtually any other leather product. I would also suggest downloading my free Leather Goods Care and Selection Guide by clicking the link below. I created it as a reference for you to keep on hand and use to keep all of your leather products in tip-top shape. You can download it on my personal website here: Leather Goods Care and Selection Guide


I have been involved in leather-working for almost 20 years now, teaching youngsters in my community as well as making all types of leather goods. Word gets out in a small town and people bring you all sorts of leather items to “clean” or “fix,” which is a wonderful learning experience. It is also a good lesson in what not to do. I was able to restore some of those items and found others irreparable. I will share my trials and errors with you so all your leather goods last and function at their best!
After this read, you will not only know how to clean a leather belt, but you’ll also know how to clean a leather knife sheath and many other leather products you use on a regular basis. In addition, you’ll have a much better idea for how to select the best products to treat your leather.
What is Real Leather? What is Best?
When learning how to clean leather, you have to first know what you are dealing with. The basic make-up of real full- grain leather is a strong/smooth/relatively shinny outer area of tight “grain” that appears as one smooth surface. This smooth, dense grain works into a thicker inner area, which is a twisted mass of larger and larger fibers. Tanners get to this point by removing the hair and then tan the hide using one of two main methods: vegetable or chrome. tanning.
Veg tan is the age-old method of using tannins in tree bark to produce a firm leather that holds its shape to form fit items, like your knife. Chrome tan is a relatively quick process that typically produces thinner more flexible leather that usually has the finished color dyed in–think gloves, bags, boots, etc. Full grain leather (chrome or veg tan) has the best strength for most applications and is what you should seek out.

Manufacturers do all sorts of nefarious things to materials and still get to pass it off as leather. For hard-use outdoor leather goods, stay away from the words top grain, genuine, bonded, corrected grain. Always seek out full grain leather.
The 5 Basic Steps For How to Clean a Leather Belt (or any other outdoor leather product)
STEP 1: ID YOUR LEATHER
The first of 5 steps is identifying the type of leather you have in front of you, so you can clean it with the right approach. You’re looking for one of 3 things:
- A smooth surface and a slight sheen
- An oil finish that changes color when you bend or push it around
- Leather that has a suede/velvety/fuzzy look to the finish
Those are the 3 main types you will encounter. There are many more variations of leather, but as far as care goes, this covers most items.
Leather that’s smooth with a slight sheen is the best for outdoor gear. It’s easier to maintain/condition and certainly easier to clean. This is what most hard-use outdoor belts, boots, sheaths, and holsters are made from. In the case of belts and items that retain shapes like a knife sheath it is typically full grain vegetable tan leather. Boots can be made from chrome tan leather or a combination of chrome/veg tan.

Boots can be made from a variety of leather types while knife sheaths and belts are typically smooth veg tan. These 3 types, full grain, oil tan and suede each have a different care and conditioning approach.
STEP 2: CLEAN YOUR LEATHER
When the dirt on leather cannot be brushed away with a soft shoe care brush, a damp cloth followed by a dry one works well. With mud, a soft nylon bristle brush and water can be used. Do not soak the leather. Sparingly apply the water, and quickly follow with a dry cloth. Pay attention to the stitching as well and remove any dirt from that area, too. Avoid driving dirt into the leather–attempt to lift it out and brush/whisk or float it away. Do not let mud turn into dried mud. This pulls even more oils out of the leather and can lead to mold.
Oil tan leather is used quite a bit for boots and the same cleaning process for smooth sheen leather works for it. Some oil tan leather has a bit of a nap or suede-like texture, so be careful with that and mindful again later when you get to the conditioning phase. Again, most oil tan manufactures have care “dos and don’ts” you can follow.
Suede, rough out, velvety nubuck, and any fuzzy leather needs a different approach to clean and condition. The maker has basically flipped the leather inside out or sanded down the all-important dense and strong outer surface, so you lose that natural smooth/slick barrier that cleans and conditions so well. With suede, you have millions of fuzzy little fibers that will grab onto any dirt or muck you encounter. These little fuzzies must stand tall thru all the abuse and cleaning to keep that look. I do not like suede for true outdoor boots, since it is harder to clean, keep clean, and condition. Save suede for nicer dress shoes. Countless suede and synthetic hiking boots and even military boots are made, but it is hard to maintain that new look.
With a suede or napped/velvety textured boot, always check with the manufacturer, but the end result is typically the same. I recommend a suede brush of some type followed by a spray conditioner. For care in the field, it is a process that’s hard to improvise.
What about SADDLE SOAP?
Saddle Soap is a common Leather Care product. For smooth leathers, saddle soap is indeed both a mild cleaner and a mild conditioner. It would be okay for boots and shoes that see mild use. You want belts, knife sheaths and any structurally ridged leathers to stay that way and saddle soap (with repeated use) could soften them and cause too much flexibility.
The next step of how to clean a leather belt is one that’s rarely covered in any instructions I’ve ever read.

Conditioner, a good shoe brush, lint free applicators and polishing cloths are the basic items you need for leather care.
STEP 3: HOW TO “LET YOUR LEATHER DRY”
Once leather is clean you must make sure it is dry. This is where the problems can really start. Key word is “let” leather dry. Don’t rush it. Avoid high heat, direct heat, speeding things up with oven heat, hot dashboard on a sunny day heat, right by the fire heat… you get the picture. These are all things people asked me to fix over the years. Once cracked, like Humpty Dumpty, it can’t be put back together again. Slow drying in climate-controlled rooms is best. If you are out in the field, this becomes difficult. So, just do your best and avoid any rapid drying that can cause cracking and permanent damage.
If leather gets saturated, you should be ok if you have real leather. Just let it slowly dry and apply conditioner. As leather dries, make sure it is in the same form or shape it was in before it got wet: no kinks, bends or folds that were not there before. For sheaths and items that have tighter forms, there is a chance that retention that may not fully come back. Bonded, genuine, and corrected grain leather are not as structurally sound as full-grain leather is and they could puff up like cheap particle board furniture and fall apart.
Belts have a special consideration because of perspiration. On a hot day, your belt gets wet from sweating and might not fully dry by the next day. Wetting leather makes it easier to stretch. If this happens repeatedly, your belt will eventually break at the buckle holes or the small of the back. A solution is alternate between two belts of good quality full-grain leather to give them a chance to fully dry.


A real problem for anyone who spends time outdoors. Belts and boots made from poor quality leather or “leather-like” materials will stretch and fail much easier than full grain leather.
Why Condition Your Leather?
Once your leather is clean and dry, you’re almost there! How to clean a leather belt goes hand in hand with how and when to condition those items and what to use. Over time, all leather loses the oils that keep it hydrated and flexible, so a conditioner is vital upkeep for all leather. When to condition depends on the item, frequency of use, humidity in your area/home, and of course exposure to dirt and water.

Learn how to make your own Leather Knife Sheath
Learn how to make the style of leather knife sheath often seen with high-end custom knives! Kevin walks you through, step-by-step, the process of cutting, wet molding, shaping, clamping, gluing, hand stitching, and finishing your custom sheath.
https://www.outdoorcore.com/courses/how-to-make-a-leather-knife-sheath
When to Condition Your Leather?
Heavily used items, like boots, need frequent conditioning, while lightly used items (especially those with rigidity) do not, since conditioning may soften them. A good rule to go by is to condition leather “right before” it looks and feels dry but not letting it get to that point can damage it over time. A good place to start is 1-2 times per year for seldom used items moving to ‘as needed’ for items that receive hard use. Anytime leather gets dirty or wet, you will most likely need conditioning. Think of taking a hot shower after being out in the cold all day. Your skin ends up stripped of all the oils and gets cracked and dry. Same goes for leather with water exposure. With winters in cold regions, the average home can have lower humidity than the Mohave Desert, so be mindful of that.
Selecting A Conditioner
If the maker recommends a specific product, it is best to follow that guidance. Our ‘smooth with sheen’ leather often calls for a wax or paste type. Oil tanned typically requires a liquid oil conditioner and the fuzzy/napped/velvety stuff needs a spray. All of these are important considerations in how to clean a leather belt or any other leather product you want to keep for a long time.
From my experience, I avoid any conditioning product with petroleum, added water, or animal fats, such as neatsfoot oil. Using animal fats to condition an animal skin seems to make sense, but I have seen over-conditioning and damage with improper use. I still have the same bottle of neatsfoot oil I bought 20 years ago and, as a leather-worker, I don’t use it that much. Most conditioning compounds available advertise as waterproofing. In reality, it’s more like water resistance, since it will break down with use and need to be reapplied. This is especially true with high-use items like boots.
As a beekeeper, what I recommend for the smooth/sheen leather is a wax/paste type that contains beeswax, which I consider the key ingredient in leather care. Below are three conditioners I recommend and all contain some beeswax along with other natural ingredients:
- Skidmore: https://amzn.to/3sPm1ng
- Smiths: https://amzn.to/2R4noRe
- Otter Wax: https://amzn.to/3cM3O4q
Oil tanned leather is primarily found in boots. Here it’s important to seek out the manufacturer recommended conditioner, which will typically be an oil-based product. I don’t like using a liquid unless it is required. There is the potential for the user to over saturate the applicator and the leather goods. When I do use or recommend them, Otter Wax and Preservation Solutions brands work well. Bickmore No. 4 is a notable conditioner worth mentioning and is very mild and easy to use for light duty items.
For Suede and anything fuzzy, stick with a manufacturer recommended spray. The key with any spray conditioner for the fuzzy stuff is to protect and provide water resistance while keeping all those little fuzzy fibers or nap from getting smashed down. Some of these are water-based, which means with hard use you could be reapplying more often. If you have no manufacturer recommendations for suede, nubuck, or rough out leather, then test and try Otter Wax, Fiebings or Bickmore–all carry a spray for this type of leather.

STEP 4: TEST YOUR CONDITIONER
Light colored leather can darken permanently when you condition it. Just how much depends on the leather and the conditioner. Test the conditioner you’ve selected for your leather belt, especially if you’re particular about the color. Some manufacturers advertise their product to not darken leather. Even so, always test first if that is of concern.
For testing, seek out and test in a small inconspicuous area of the item. Most treated leather will return to its normal shade of color after about 2 hours. If it not, wait up to 2 days to see just how much of a change takes place. Chances are it will just be one or two shades darker. If there is too much change , then you might have to seek out another product .

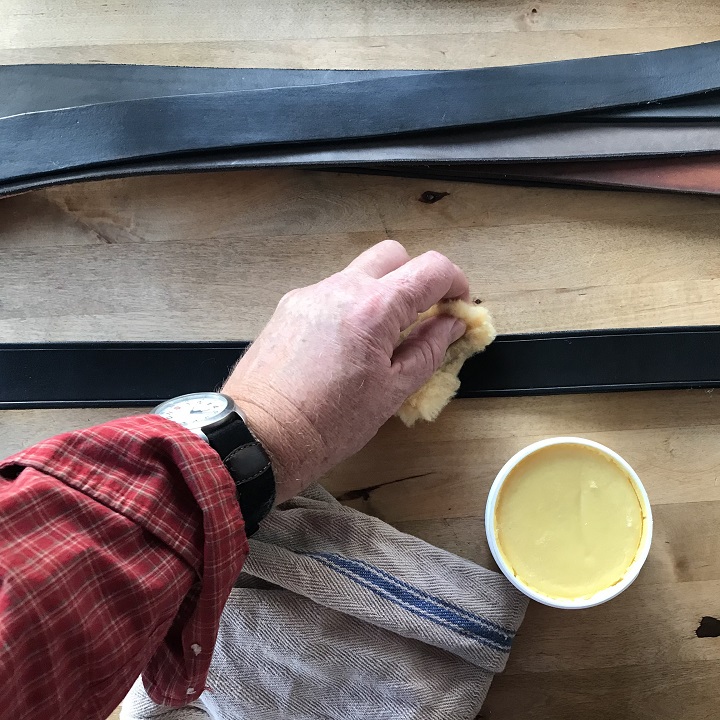
STEP 5: APPLY YOUR CONDITIONER
When your leather is clean and dry, its time to condition! REMINDER: boots need to be flexible, so heavier and more frequent applications of conditioner is ok with heavy use. Use conditioner more sparingly for belts, knife sheaths, and any type of ridged or firm leather goods. A paste-type conditioner for these things will prevent over-softening the leather. If it is rigid leather, don’t treat in like a ball glove and really work, it in there.
With waxes and oils, I like to use either a lambs wool applicator, old wool sock turned inside out, lint free cloth, or applicator sponge. Work the conditioner in evenly with a circular motion over the entire surface, paying close attention to stitching and edges. Give the edges a little more conditioner than the smooth surface. Edges soak up more conditioner, so keep them burnished so they don’t absorb dirt and water. This is especially important on belts. A key to quality belts, sheaths, and holsters are edges that are rounded, burnished, and smooth–not rough, squared, or fuzzy.
With any wax/oil conditioner, wipe away excess with a dry lint free cloth and buff the surface to polish it. Congratulations you are done! Almost.
Proper Storage
Now that you know how to clean a leather belt, it’s time to store your clean, dry, and conditioned leather goods. The most important part of this mindset is storing leather in the rooms you live in. Belts, holsters, and sheaths are especially prone to mold since you may have transferred sweat, dirt, or grime into the leather.
Avoid storing leather goods in dark closets, damp basements and areas of the home that do not have climate control. Rooms with dry heat source, like a wood stove, must be avoided. Storing in an airtight container or plastic tote can also cause mold issues. I keep holsters, sheaths, and other leather goods in wicker baskets on a shelf in the family room. It is an airy and sun-filled room (no wood stove) where I can keep an eye on the shape everything is in. My belts get hung by the buckle on the front of my closet door and any hard-use boots are right there inside the door. I have had a few belts and one knife sheath grow mold on me over the years, and it’s always due to improper storage and cleaning on my part.
Conclusion-How to Clean a Leather Belt (and other leather goods)
Maintaining leather goods is beneficial to everyone and even more critical out in the field or in a survival situation. Now you know how to clean a leather belt the proper way. Remember that for outdoors, survival, and wilderness use always seek out full-grain leather as the most durable option. Hopefully, the mantra of ID, Clean, Dry, Test and Apply is easy to follow and you are better prepared for what life throws at you and all your leather goods!

Leather care does not have to be complicated. ID-smooth-oil-fuzzy, is it Clean and Dry? Test and Apply!
This article is by Kevin Luebke from https://www.booneslickleather.com/. Kevin has had a lifelong interest in the outdoors. His hobbies include hiking, canoeing, beekeeping and leatherwork. He has drawn great inspiration from the life and mindset of Daniel Boone, growing up not far from his final homestead in Missouri. Kevin has been making his own belts, knives, knife sheaths and other leather gear for over a decade. He has also served as a volunteer instructor teaching leather work to kids and young adults in his community.


